Wednesday, April 28, 2010

Easily build BI Server from behind an NTLM proxy

Pentaho projects bases on Apache IVY to manage project's dependencies. This is good because it gives you a consistent and uniform way to manage projects dependencies but gives you some troubles if you need to make a build of one of the many Pentaho projects from behind an NTLM firewall.

So here it is a brief and concise survival guide about how to do that quickly and efficiently.

Install a local proxy in you development computer

First of all download cntlm a local proxy that let you easily authenticate through your company or customer NTLM authentication proxy. You've versions for Windows and Linux. I learned about it two years ago when I was on Linux and I had to manage some Maven projects. Now I'm on Windows and the good for me is that it has a version also for this platform (I tried using also ntlmaps but I wasn't able to have it working properly with IVY)

Installation is really simple but, on WIndows, has a tweak we will talk about later. Download the .zip from sourceforge and unzip it wherever is fine for you. Execute the setup.bat and it will rapidly install the local proxy as a Windows Service.

Go to the installation directory (typically C:\Program Files\cntlm) and edit cntlm.ini. Replace the informations for username, password, domain and your proxies hosts and ports as detailed in the file excerpt given below

#
# Cntlm Authentication Proxy Configuration
#
# NOTE: all values are parsed literally, do NOT escape spaces,
# do not quote. Use 0600 perms if you use plaintext password.
#

Username        <your_username>
Domain          <your_domain>
Password        <your_password>   # Use hashes instead (-H)
#Workstation    netbios_hostname        # Should be auto-guessed

Proxy           <1st_proxy_host>:<1st_proxy_port>
Proxy           <2nd_proxy_host>:<2nd_proxy_port>

#
# This is the port number where Cntlm will listen
#
Listen                3128

Make the changes and save the file. Now, before starting the local proxy service, here is the tweak. In my case, the setup.bat script forget to set a service startup parameter that sets the cntlm configuration parameter file location. So to workaround that, open your registry and go to the following key HKEY_LOCAL_MACHINE\SYSTEM\ControlSet001\services\cntlm\Parameters. Look for the AppArgs attribute and modify it adding the parameter -i "C:\Program Files\Cntlm\cntlm.ini" as shown below


After that you're ready to start you service successfully otherwise you'll get an error.

Back to our Pentaho's project build

In my case I was making a build of the newest bi-server 3.6 get from the related branch of Pentaho repository (http://source.pentaho.org/svnroot/bi-platform-v2/branches/3.6). To enable IVY to use your locally configured authentication proxy server you've to set the following environment variable before starting compiling the project

ANT_OPTS=-Dhttp.proxyHost=localhost -Dhttp.proxyPort=3128

It is up to you to decide where to set that variable either as a Windows environment variable or from within a command line session (if you're starting the build manually).

And what about for the Linux users....

If you're on Linux you can install cntlm using the package manager of your favorite distro. I used it on Ubuntu and Fedora withou any problem. The configuration file is the same as before but is located in /etc/cntlm.conf. You've to change the same parameters detailed above for cntlm.ini (the file is exactly the same). Start the daemon, set the ANT_OPTS environment variable and have fun with your build.

Wednesday, April 21, 2010

CDA configuration files basics (part 1)

Last time I give a brief explanation about the basics of CDA compilation and deployment and I showed you how to start executing a simple query on our datamart using CDA getting  back a resultset formatted as you expected. I decided to take you to a fully functional sample going through a set of explanatory steps summarized below:
  • Explain the structure of CDA files and learn how to built a new one
  • Show the basic verbs you can use to interact with CDA
  • Put everything together with a working example
Before start playing with CDA remember to get the latest CDA sources compile it and reinstall the plugin as explained in my first post on this blog.

CDA files has a very basic structure. They are very easy to be learned also by a novice user with a basic knowledge of XML. Basically a CDA file contains definitions for some important elements
  1. datasources
  2. data access
  3. compound data access

The DataSource element

Datasources in CDA have the usual meaning of a named connection to a database server. The name (in our case the connection id) is commonly used when creating a query to the database.

Each DataSource is made up by a set of connections defined as follow:
  • has an id attribute to uniquely identify the connection in this CDA datasource definition. Of course we cannot have two connections with the same id.
  • has a type attribute whose value depends on the connection type. We've different connection types one for each datasource type: sql, mondrian, Pentaho Metadata (MQL), Olap4J
  • a set of other elements that differs depending on the connection type
We can have 1 or more connections in the DataSource element according to your needs.
    Configuring connections to relational sources 


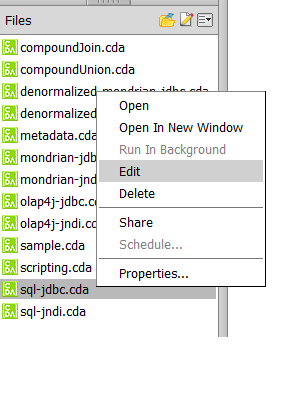
    If we look at the samples that comes together with the latest CDA distribution you have a sample for each of the possible connection types. Open PUC console and go to the folder bi-developer/cda/cdafile and you have the list of cda definitions shown below in the files window. As you can see every CDA file is identified by a specific icon.

    First interesting point: to open a file we've a CDA files editor integrated in Pentaho console. Cool! So to open a CDA file select it, right click on the file name and select Edit


    Let's have a look at how to connect to a relational datasource. We've two samples for that. One to connect through jdbc and another to connect through a JNDI datasource. Open the sql-jdbc.cda for example (the jdbc one). As you can see, in the right area of PUC console the editor opened and shows you the file content. CDA editor is the standard tool to modify  CDA files in a quick and easy way. You can modify your file, save it and also test it using the preview functionality (we'll talk about it later). Looking at the file immediately after the CDADescriptor element you'll find the DataSource element and, as its child, the connection definitions.


    As you can see you can find a connection with id="1" and type="sql.jdbc" and then a set of elements describing properties that are directly related with the selected connection type (in this case the definition of a jdbc connection so we've elements for driver, url, username and password). Take your time to go through all the other samples and see the differences in connection types.

    The DataAccess element

    The DataAccess contains the definitions for the query that needs to be executed, the parameters the query accepts and some other side elements that we will explore in the next steps.

    A DataAccess element:
    • has an id, 
    • has a descriptive name (given through a child element), 
    • links a specific connection id defined in the previous DataSource section, 
    • contains a query element,
    • contains a set of given parameters (not mandatory),
    • contains a set of other not mandatory definitions will go thorugh in the next steps. 
    We can have one or more DataAccess elements in our CDA file.
    So go back to our example (sample-jdbc.cda) and continue our exploration.


    As you can see in the picture above we've some things to be noted:
    • Remember to give an id and to link the connection defined in the DataSources section 
    • Because we're writing text as value of an xml file element, remember the that comparison operators < > has to be written respectively as &lt; and &gt; otherwise you'll get an error.
    • Parameters has given a name. In the query you can indicate a parameters with the usual syntax ${<parameter_name>} where parameter_name is the exact name of the parameter we're going to apply in the where clause.
    • Every parameter has a type that, together with the name, needs to be mandatory given. Supperted types are: String, Date, Numeric and Integer. Any parameters can have a default value specified.
    • If the parameter's type is Date you can specify a pattern you followed for your date format.
    Test the query

    To test our DataAccess definition before moving foward with our implementaion click on the Preview button. When the Preview form appears you can select the DataAccess definition you want to test and see the results below on a nice looking table.

    Some things to note:
    • the previewer sets the default values for the query (if any) but you can change them accordingly to your needs, 
    • the date format for the orderDate parameter follows the pattern specified in the CDA file definition.

    Now I'll give you the time to play with the samples and experiment a bit. Next time we'll talk about the second part of the DataAccess elements and CompoundDataAccess definitions.

    Friday, March 19, 2010

    A first look into Pentaho CDA

    These days I decided to have a look into Pentaho CDA the newest idea from Pedro Alves. The project is available here on Google code. He gave announcement about this two months ago in his blog and immediately it appeared interesting.

    What is CDA?

    CDA is a BI Platform plugin that that allows to fetch data in various formats. The good things are that it allows you to acces data using all of the possible data sources you can use in BI Server (SQL, MDX, Metadata, Kettle etc.) and can be used by any client (internal or external to BI Server) because you can call it through a simple url and it gives you back a data stream.

    Let's go and compile the code

    So after some very busy days of hard work were I only had the opportunity to keep my local copy of the code updated with the repository and see what's going on, yesterday I had some time available and I was able to compile it and give it try. The framework easily compiles with the ant script you find in the source tree. The only thing you've to consider is to create a file named override.properties containing a set of definitions related to your working environment

      plugin.local.install.solutions.dir = <substitute_with_your_biserver_home>/pentaho-solutions   
      plugin.local.install.user = joe   
      plugin.local.install.pass = password   
    

    After having compiled the code successfully you can install it under your BI Server rel. 3.5.2 with the command

     ant install-plugin  
    

    The basics

    Immediately after our successfull compilation and installation we can start biserver and login into the system. Under the bi-developer solution you have a folder named CDA where you can find an extended set of examples to start playing with.

    CDA configuration is based on xml files. Every xml file contains a set of data access definitions. Everyone is identified by an id and has a specified data access method. I don't copy and paste a sample here because you can have a look in the samples by yourself. They are very simple and the format is immediately understandable so that you can easily edit them by hand.

    Basically you can have your output data stream in multiple formats. At the time of writing this article you can use JSON (the default), XML, Excel and CSV. This gives you the maximum flexibility on what you can do with that data.

    If you want to try to execute a query using a data access method defined in your .cda file you can use the following this sintax

    http://<biserver_host>:<port>/pentaho/content/cda/doQuery?solution=bi-developers&path=cda/cdafiles&file=sql-jndi.cda&outputType=xml&dataAccessId=1

    This calls the method doQuery to execute the query using the dataAccess with id 1 defined in sql-jndi.cda and located under the  solution bi-developers in folder cda/cdafiles giving you the output using XML. Try to execute it changing the output type and see what happens. Remember that if you don't specify an output type it will be JSON by default.

    Suppose that we wnat an output typ like xml, the answer you'll see in your browser window is something like this

    Shipped20044114929.96Shipped20051513074.46

    almost insignificant but, if you get the page source you clearly can see the xml stream sent to you by our CDA plugin

     <CdaExport>  
          <MetaData>  
               <ColumnMetaData index="0" type="String" name="STATUS"/>  
               <ColumnMetaData index="1" type="Numeric" name="Year"/>  
               <ColumnMetaData index="2" type="Numeric" name="price"/>  
               <ColumnMetaData index="3" type="String" name="PriceInK"/>  
          </MetaData>  
          <ResultSet>  
               <Row>  
                    <Col>Shipped</Col>  
                    <Col>2004</Col>  
                    <Col>4114929.96</Col>  
                    <Col isNull="true"/>  
               </Row>  
               <Row>  
                    <Col>Shipped</Col>  
                    <Col>2005</Col>  
                    <Col>1513074.46</Col>  
                    <Col isNull="true"/>  
               </Row>  
          </ResultSet>  
     </CdaExport>  
    

    Really cool! If you don't want to make your hand dirty in changing jdbc definitions I suggests you to try all the files whose name contains the word jndi that means they use a datasource and not a direct jdbc connection defined in the file (these are the files that contains the word jdbc).

    Read the next part of this serie and learn about CDA configuration files basics

    Thursday, February 25, 2010

    Customize CDF jfreechart component

    I was dealing with CDF Dashboards during these days and I had to set line-width and line-style attributes in my jFreechartComponent's LineChart widget.

    Looking at the jFreechartComponent documentation you clearly see that in the standard implementation some attributes, specifics only to some chart types, aren't implemented. This was also for the two attributes line-width and line-style related to the LineChart widget.  But this is not a problem because we can add that missing attibutes very easily and I'll show you how. The interesting thing is that I can manage all the attributes that are available for a specific JFreeChart chart type.

    If you need to add support for missed JFreeChart chart's attributes you can follow the steps summarized below. We suppose to add line-width and line-style attributes and to access them from CDF jFreechartComponent as two properties respectively named lineWidth and lineStyle.

    1) Go to <biserver-home>/pentaho-solutions/cdf/components and open jfreechart.xaction and open it with your favourite editor.


    2) Add two new elements to the inputs section of the .xaction file. Below an example of the file with the two new inputs added. Remember here that the value of the request element (see lines 5 and 11 below)  has to be the same in name and in case as the name of the property we want to put in our CDF jFreechartComponent definition. Then be careful to correctly assign a the default value needed in case that the property isn't provided (see lines 7 and 13) by you CDF component call. This is particularly important when our attribute is a number. If you don't assign it properly you'll get a NumberFormatException.

    1:  <inputs>   
    2:    <!-- Omitted for brevity -->       
    3:       <LINEWIDTH type="string">  
    4:            <sources>  
    5:                 <request>lineWidth</request>  
    6:            </sources>  
    7:            <default-value>1.5</default-value>  
    8:       </LINEWIDTH>  
    9:       <LINESTYLE type="string">  
    10:            <sources>  
    11:                 <request>lineStyle</request>  
    12:            </sources>  
    13:            <default-value/>  
    14:       </LINESTYLE>  
    15:    <!-- Omitted for brevity -->       
    16:  </inputs>  
    

    3) Add the new inputs previously defined in the inputs section (see above) to the  action-inputs section of our ChartComponent action-definition (as shown below at lines 7 and 8). Then, use these new fields to populate two new property elements added to the chart-attributes section as shown at line 25-26. Be very careful here because the name of the element you give to every new chart attribute has to be equal to the related attribute for the JFreeChart library. For example: if in JFreeChart library the line width  attribute is named line-width that is the name to be considered as child element of the chart-attributes element. Then the value to be assigne to that new element is the name of the related action input element (for line-width we will assign as value the LINEWIDTH element. See line 25 below).


    1:       <action-definition>   
    2:            <component-name>ChartComponent</component-name>  
    3:            <action-type>Chart</action-type>  
    4:            <action-inputs>   
    5:                 <chart-data type="result-set" mapping="newResults"/>   
    6:                  <!-- Omitted for brevity -->       
    7:                 <LINEWIDTH   type="string"/>  
    8:                 <LINESTYLE   type="string"/>  
    9:                 <!-- Omitted for brevity -->       
    10:            </action-inputs>  
    11:            <action-resources/>  
    12:            <action-outputs>   
    13:                 <chart-filename type="string"/>   
    14:                 <base-url type="string"/>   
    15:                 <chart-mapping type="string"/>   
    16:                 <image-tag type="string"/>   
    17:                 <chart-output type="content"/>   
    18:            </action-outputs>  
    19:            <component-definition>   
    20:                 <width>{WIDTH}</width>   
    21:                 <height>{HEIGHT}</height>   
    22:                 <by-row>{BYROW}</by-row>   
    23:                 <chart-attributes>   
    24:                 <!-- Omitted for brevity -->       
    25:                      <line-width>{LINEWIDTH}</line-width>  
    26:                      <line-style>{LINESTYLE}</line-style>  
    27:                 <!-- Omitted for brevity -->       
    28:                 </chart-attributes>   
    29:            </component-definition>   
    30:       </action-definition>